- Print
- DarkLight
Integrate Cloud Instant Backup Recovery with Backblaze B2
- Print
- DarkLight
Backblaze B2 Cloud Storage is a certified cloud object storage solution partner for Cloud Instant Backup Recovery (IBR). Cloud IBR is a fully-automated disaster recovery SaaS platform for Veeam backups that you store in Backblaze B2 providing an on-demand, automation-driven, bare-metal server, networking, and storage infrastructure.
Architecture
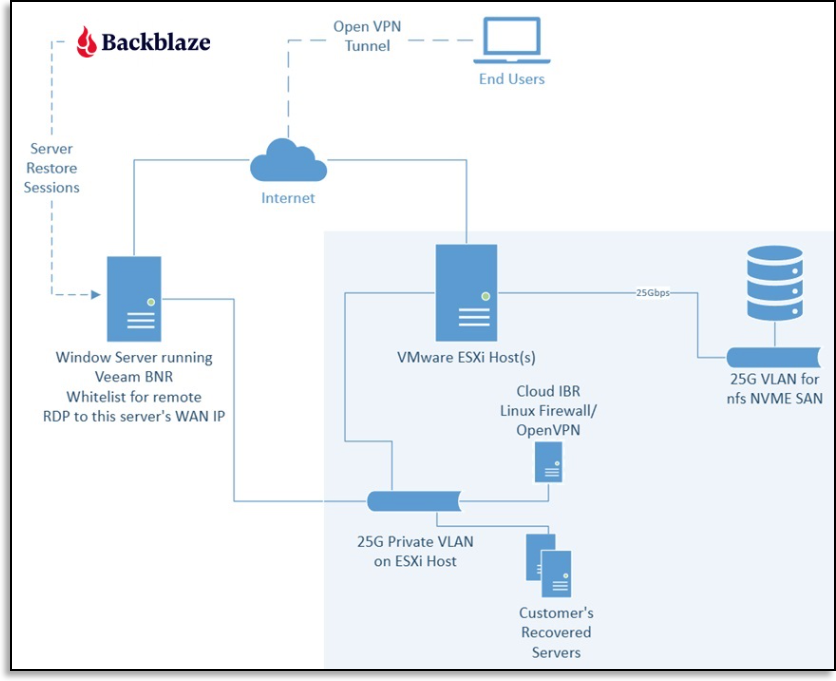
The following graphic provides an architecture overview of this solution.

Requirements
Before you begin, you must set up the following accounts and software:
- Fully licensed Veeam Backup deployment version 10 or later
- An active Backblaze B2 account
- Veeam backups that are stored in Backblaze B2
- Create a Bucket
- Create an Application Key
Ensure that you select Read Only as the access type. - Upload your Veeam files to Backblaze B2
- Active Cloud IBR subscription
- If you do not already have an active Cloud IBR subscription, you can use the promo code veeam30 to get a 30-day free trial to Cloud IBR.
- After you fill out the registration form, you receive an email to verify your email address.
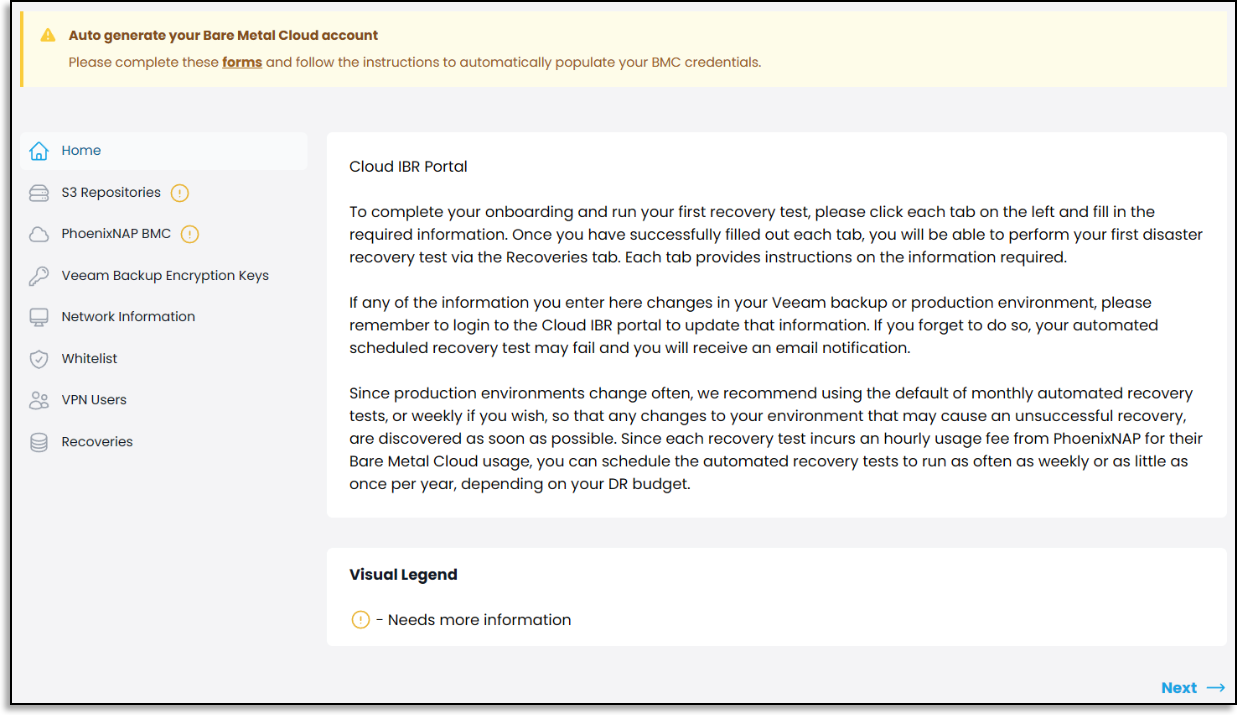
- After your account is verified, the Cloud IBR portal is displayed. Click forms in the yellow note, and enter your contact and credit card information. After you fill out this form, the Cloud Provider List that is displayed in the "Configure a phoenixNAP Environment" task below is auto-populated with your "IBR Auto Generated" credentials.
- A confirmation message is displayed.
Cloud IBR Dashboard
After you verify your Cloud IBR account and sign in to the Cloud IBR portal, the Cloud IBR dashboard is displayed where you complete the onboarding and configuration process. The following procedures guide you through this process, and there are additional instructions on each page as you walk through the onboarding portal.

Connect Cloud IBR to Backblaze B2
- Sign in to Cloud IBR.
- Select S3 Repositories in the left menu.
- Click Add Backup Repository.
- Enter the Backblaze B2 S3 Endpoint that you copied when you created a bucket.
- Enter the Backblaze B2 bucket name.
- Enter the Veeam backup folder name.
- Enter the Backblaze B2 keyID and the applicationKey that you copied when you created an application key.
- Click Save.
- Repeat these steps for each bucket that you want to restore during a recovery.
Configure a phoenixNAP Environment
The Cloud Provider List is auto-populated with your "IBR Auto Generated" credentials.
- Select PhoenixNAP BMC in the left menu.
- Click Add Recovery Storage.
- Enter your storage requirements (between 1 TB and 25 TB).
- Click Save.
- Click Add Desired Memory.
- Select a memory value, for example, 256.
Your Cloud IBR subscription is tied to the amount of total desired memory. For more information, see Cloud IBR pricing. To estimate the phoenixNAP pay-as-you-go charges, click here. - Click Save.
- Select a memory value, for example, 256.
Add a Veeam Encryption Key
You can add each encryption key that you use within Veeam to encrypt your backups to Backblaze B2.
- Select Veeam Backup Encryption Keys in the left menu.
- Click Add Veeam Encryption Key.
- Enter a hint for your encryption password, and enter the encryption key that you copied from Veeam. You can click See Veeam Screenshot for information about locating this key.
- Click Save.
Add a Network Gateway and Port Mapping
Add a network gateway, and at the time of disaster, Cloud IBR provisions a Linux firewall that includes all of the addresses that you enter and opens all of the ports that you enter.
- Select Network Information in the left menu.
- Click Add Gateway.
- Enter a description.
- Enter the IPv4 address.
- Select a Mask.
- Click Save.
- Repeat these steps for each production gateway that you want to add.
- Click Add Port Mapping to allow for inbound access from the internet to any of your recovered servers on each port that you open.
- Enter a description.
- Enter a port number.
- Enter an internal production IP address.
- Click Save.
- Repeat these steps for each port that you want to map.
Add a Whitelist Host and Whitelist Network
You can add whitelist hosts and networks so that your IT team can connect to the management IP addresses of the physical hosts that Cloud IBR builds for you.
- Select Whitelist in the left menu.
- Click Add Whitelist Host.
- Enter an IP address.
- Enter a description.
- Click Save.
- To enter multiple IP addresses, click Add Host and repeat these steps.
- Click Add Whitelist Network.
- Enter a network.
- Select a mask.
- Enter a description.
- Click Save.
- Repeat these steps for each whitelist network that you want to add.
Add a VPN User
You can add disaster recovery (DR) testing users and end users. DR testing users have VPN access to the recovery environment for all recoveries (test and actual disaster recovery events). End users have VPN access only to the recovery environment when you (the Cloud IBR Administrator) include them in a DR test. They always have VPN access during an actual disaster recovery event.
Each specific user receives an encrypted email with their VPN credentials, a download link for OpenVPN software, and their client configuration file, depending on whether you include end users in the test.
- Select VPN Users in the left menu.
- Click Add DR Testing User.
- Enter an email address.
- Click Save.
- To enter multiple VPN users, click Add Another Recovery Test User and repeat these steps.
- Click Add End User.
- Enter an email address.
- Click Save.
- To enter multiple end users, click Add Another End User and repeat these steps.
The onboarding process for Cloud IBR and Backblaze B2 is complete.
Begin a New Recovery
You can now begin a test recovery or an actual recovery.

- Click Recoveries in the left menu.
- Click Start New Recovery.
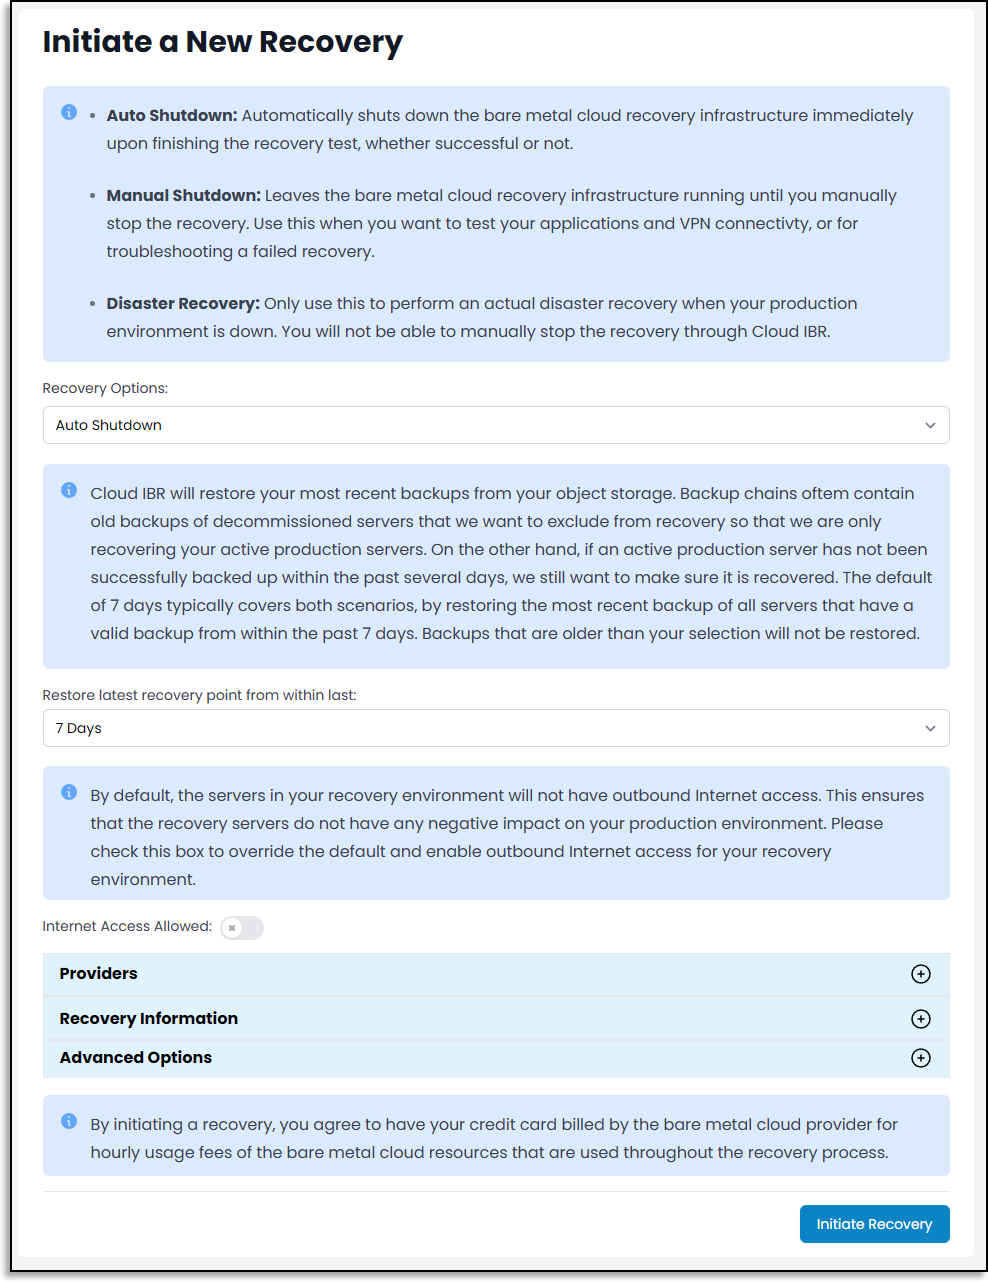
- Select one of the following recovery options:
- Auto Shutdown automatically shuts down the bare metal cloud recovery infrastructure as soon as the recovery test is finished, whether the test is successful or unsuccessful.
- Manual Shutdown leaves the bare metal cloud recovery infrastructure running until you manually stop the recovery.
- Disaster Recovery performs an actual disaster recovery when your production environment is down.
- Select a timeframe in which to restore.
- Optionally, enable internet access. By default, servers have inbound internet on the ports that you mapped, but they do not have outbound internet access.
- Select one of the following recovery options:
- Click Initiate Recovery.
- Click Click here to see it to monitor the status of your recovery.
Your server restores begin within approximately 60 minutes. After the recovery completes, your VPN credentials, server and network details, and credentials for your physical servers running in the baseboard management controller (BMC) are displayed. - To view historical recoveries, select Recoveries in the left menu and click the Recovery ID of the recovery that you want to view.

