Over the holidays, I was doing what every 20-something does with their family over break… teaching them the ins and outs of Facebook! “How do I comment on a post?” or, “Where do I share my status?” are the usual questions, but this time my uncle asked me something that I didn’t have a clear answer for: “How do I download the photos I’ve posted on Facebook?”
A little backstory: My uncle has spent every family reunion taking tons of pictures of our extended relations and then sharing everything on Facebook. As we were talking, I realized—with a little horror—that Facebook was the only place he kept copies of his photos. Forget backups, he didn’t even have the originals on his home computer. He just wanted copies saved on his personal device so that he could share the photos with the non-Facebook-using members of our family, but I wanted to ensure that our cherished history wasn’t locked up on Facebook or lost forever.
It’s increasingly common to realize that you’re missing photos that you know are only on Facebook or Instagram or Twitter. But it seems like most of us—myself included, until just recently—are unsure of how to retrieve and save these images without spending days copying each picture to our camera roll. So to help my uncle, and my family, (and hopefully you!), I went on a search for an easier answer to downloading albums from Facebook.
What I found was a very easy way to not only extract photos but also to download all of your personal data from Facebook. So whether you are doing this because you wish to leave the social media world behind but don’t want to lose your memories, or you would just like to keep a copy of everything you post, here’s a guide for how you can extract your data from Facebook, Instagram, or Twitter—and a little encouragement to ensure it’s all backed up once you’re done.
How To Download Your Facebook Data
Facebook has a tool that lets you download all your data—including those “wall” posts you made on friend’s profiles, the chat messages to old colleagues trying to reconnect, the “About You” information you wrote in the late 2000s you may have forgotten was there (or at least, that you may want to forget), and, of course, the photos.
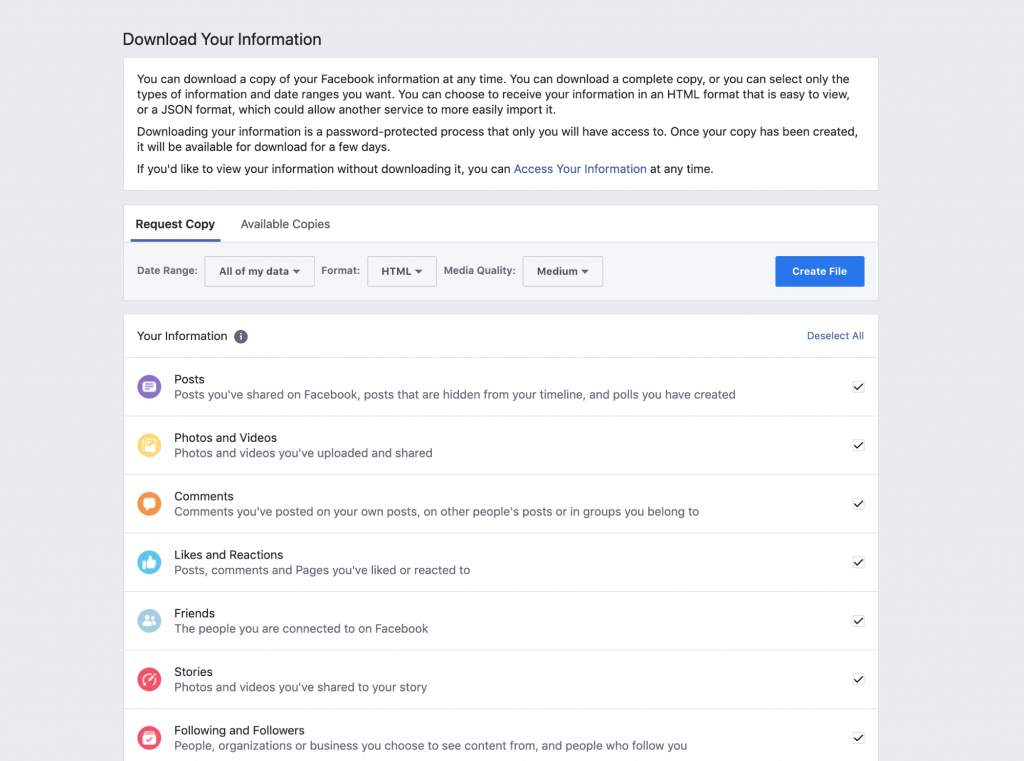
On the Facebook site, after you’ve logged in, navigate to “Settings,” or go to Facebook.com/settings. After you’re there, click on “Your Facebook Information” in the column on the left. This is the page where you can view, download, or delete your data at any time. To download your information, click the “Download Your Information” button. This will open the following screen:

On this page, you can select the types of information you would like to download and the date ranges you want. You can also select from 24 different categories in which Facebook collects your data. This ranges from your posts, to the advertisements you’ve interacted with, to your likes/reactions, your search history, and more. This is where you can click “Photos and Videos” if you would like to extract just those files from your Facebook.
After selecting what you would like to download from your Facebook account, you will need to select the file format you would like to receive the data in. They give you the option to choose between HTML and JSON formats. HTML is the more user-friendly option for those who are not very tech-savvy as it makes your data easy to read. JSON is a little more technical, but it is useful for exporting your data and importing it into various applications across the web. This is because the format is a subset of JavaScript, making it a popular choice for most web services and applications.
Facebook will let you know when your copy is complete, so you can download the file to your preferred device. It’s as simple as that! My uncle had all of his wonderful photos from our family reunions within minutes. Depending on how much content you’ve posted to Facebook it might take more or less time for the file to be prepared.
How To Download Your Instagram Data
Although most users interact with Instagram through its mobile app, you’ll need to log into your account in a web browser to download your data. Once you are logged in on Instagram.com, navigate to your profile page (click on the little “person” icon in the upper righthand corner) and then click on the “gear” icon next to the “Edit Profile” button and select “Privacy and Security.”

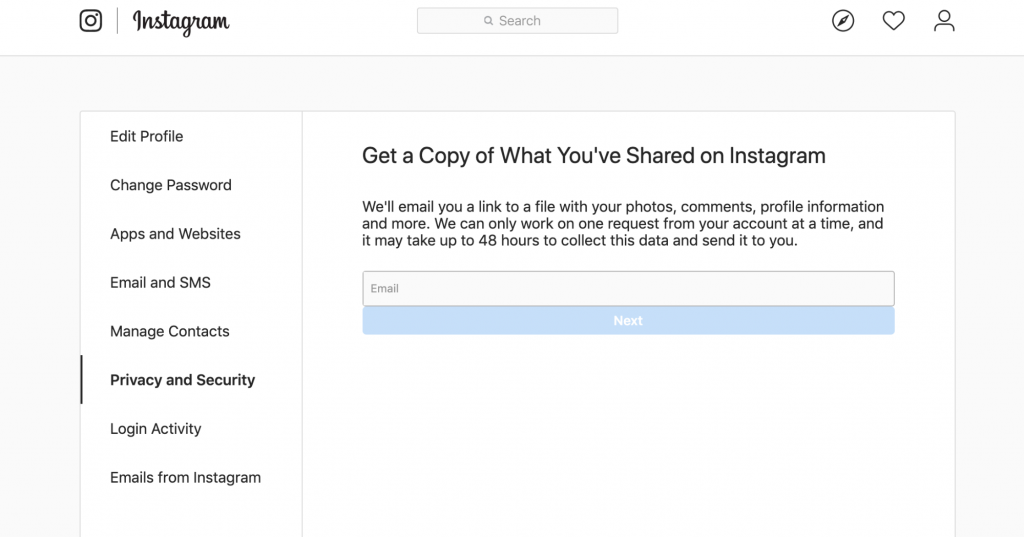
Once on the privacy and security page, you should scroll down to “Data Download,” and click “Request Download.” On this page, (pictured above) you can request a copy of what you have shared on Instagram. All you need to do is enter the email you would like your data sent to, then enter your account’s password, and up to 48 hours later you will receive a file including all of your profile information, photos, videos, archived Instagram Stories (those posted after December 2017), your post captions, and direct messages.
How To Download Your Twitter Data
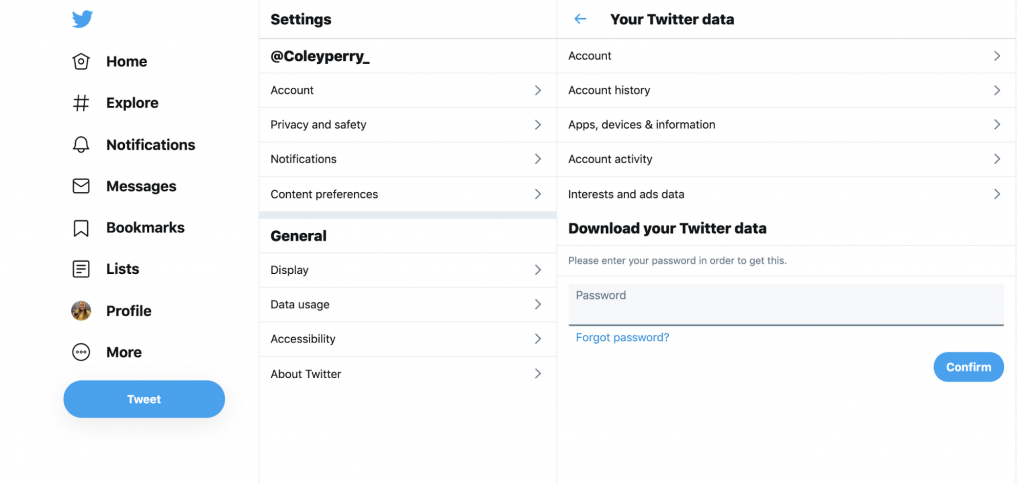
Comparable to the Instagram process, you will need to log in to your Twitter account on a web browser to start the process of downloading your data. After logging in, start by clicking on the “More” section in the navigation bar. From there, a new navigation bar will appear. You should select the “Settings and Privacy” tab to progress.
Under the “Account” section, you will find an area labeled “Data and Permissions.” Here, you can select “Your Twitter Data” and it will lead you to a new page where you will be able to download your data.

Twitter will ask you if you would like to request an archive of your Twitter data or Periscope data. (Periscope is a live video streaming app for Android and iOS that you can use to “go live” on Twitter.) Once you select if you would like to download your data from Twitter, Periscope, or both, then you can click the button labeled “Request Archive.” You’ll get a notification with a link when your archive is ready to be downloaded. At that time, you will receive a ZIP file from Twitter with what they believe is most relevant and useful to you. This will include your direct messages, Twitter moments, profile media, and media you used in your tweets like gifs, photos, and videos.
You’ve Downloaded Your Social Media Data—Now What?
If you are looking up how to download your photos and videos from social media sites like my uncle and I did this winter break, then you must be doing this for a reason, and that reason could be that you don’t want to lose these memories. Protecting your newly downloaded Facebook, Instagram, and Twitter data with a good backup strategy should be the next thing on your list.
Make sure to have at least two backups: One local, on your desktop or on a hard drive (it’s best to have both!), and one in the cloud. Having two (or 3) backups of your data from Facebook, Instagram, and Twitter ensures that you will never lose those pictures you shared, funny tweets you created, and all the creative captions you use for your posts. For more on how to keep your newly downloaded social media data safe, read our Backblaze Computer Backup Guide.
Are there any other social media sites that we missed that you would like to know how to download your data from their site? Share them in the comments below!


 A Sandbox in the Clouds: Software Testing and Development in Cloud Storage