Backups are your best defense against ransomware and other types of data loss. Thankfully it is quick and easy to back up all your Veeam data to Backblaze B2 Cloud Storage within minutes—and we have the videos to prove it!
What is Veeam?
Veeam is well-respected backup and disaster recovery software that works across many platforms and hardware/software configurations. Founded in 2006, Veeam Software is a U.S.-based company that operates in over 180 countries and has 400,000 customers—many of them Fortune 500 companies.
The Veeam and Backblaze B2 Cloud Storage Integration
Backblaze has partnered with Veeam to deliver the most reliable, affordable, and secure data protection and cloud storage target for your data. Veeam Backup & Replication provides modern data protection for your cloud, virtual, and physical workloads to solve your challenges around backup, recovery, archive, disaster recovery, and ransomware.
Get Your Guide to Server Backup
There are lots of things to consider when you’re creating a solid server backup strategy. Use our guide to learn how to safeguard your server data with backups that preserve your information in case of disaster.
With a transparent pricing model that is a fraction of the competitors’ cost, Backblaze B2 Cloud Storage helps you plan your budget effectively and store more than four times the restore points you could otherwise. With Backblaze B2 as your cloud tier storage destination in Veeam, you can store your data for $6/TB per month with no minimum retention requirement, tiers, or hidden fees.
Additionally, Backblaze is certified as Veeam Ready—Object and Veeam Ready—Object with Immutability. Immutability is an important part of protecting backups from threats such as ransomware or stolen credentials because it allows you to protect objects from being changed, deleted, manipulated, copied, or encrypted for a specified, user-defined time period. Even better, Backblaze does not charge an extra fee for the use of the object lock feature.
Editor’s Note: Product Update
Object Lock users, great news! As of September 2022, you can enable Object Lock on existing Buckets making it far easier to set immutability on all of your data already stored in B2 Cloud Storage—easing your path to enhanced cybersecurity and compliance strategies.
If you have any questions, feel free to browse our Help Articles or reach out to Support.
How Does Veeam Work with Backblaze B2 Cloud Storage?
Backblaze is a proud partner of Veeam and is fully compatible with Veeam Cloud Tier. Using Backblaze B2’s S3-compatible API, you can set B2 Cloud Storage as your Cloud Tier in Veeam’s Scale-Out Backup Repository.
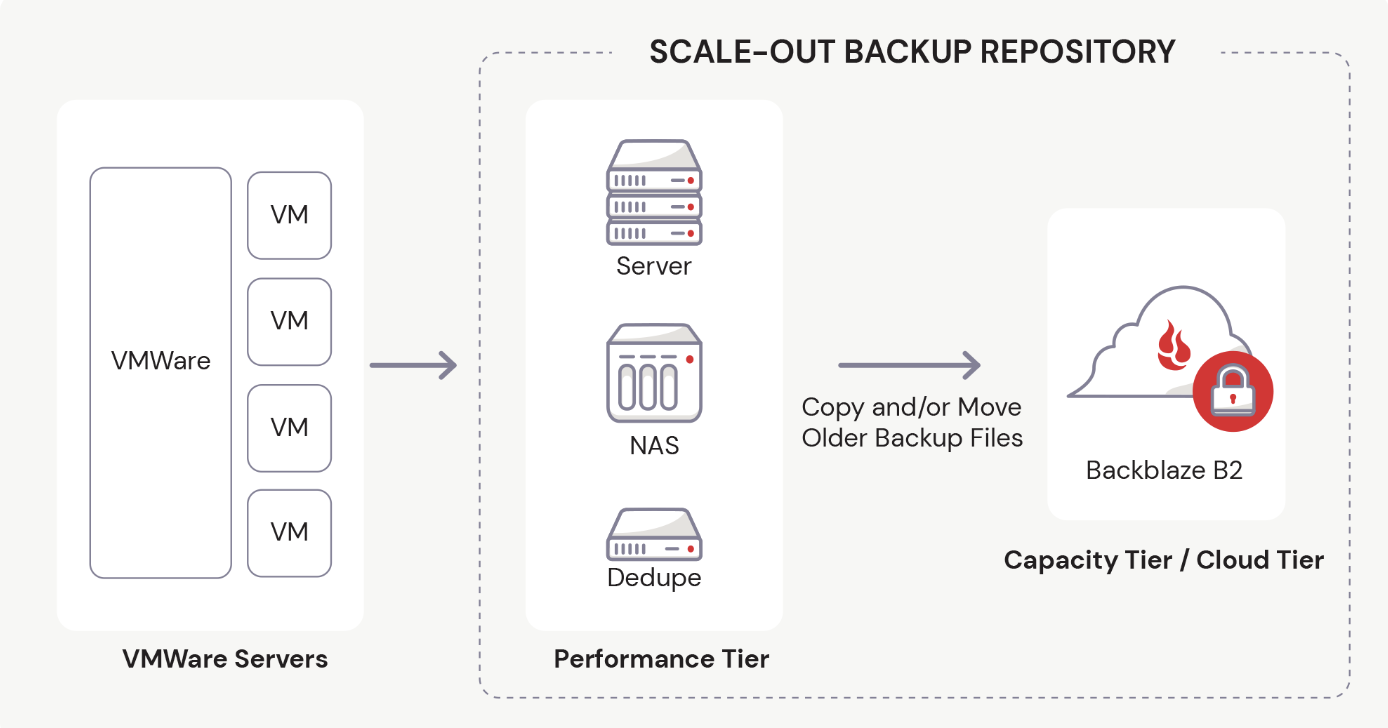
In Veeam v11 and earlier versions, you must first establish the Performance Tier, or Local Repository, before you can set up the Cloud Tier.
If you’ve been using Veeam, you probably already know how to add a local storage repository to Veeam. However, if you are one of our B2 users who are exploring this partnership for the first time, we have a video to guide you through the process. Watch as Greg Hamer, Senior Developer Evangelist, demonstrates how to set up the Local Repository in just a few minutes. If your Local Repository is already configured, then you’re ready to proceed to cloud backup!
Steps to Back Up Your Data with Veeam and Cloud Storage
To make things easy, we have created a video about How to Back Up Veeam to the Cloud. In the video, Greg demonstrates how you can securely store your Veeam data in just 20 minutes.
Step 1: Create a Backblaze Account
First, you need to set up a Backblaze account. If you already have a Backblaze account, you’re all set and can move on to step two. Otherwise, visit Backblaze’s Veeam page and click the Start Now button to create one.
The Start Now button will take you to a simple sign-up form where you only have to enter your email address and a password. Don’t worry about setting up billing just yet. You have 10GB of free space to test drive B2 Cloud Storage before you have to set up any billing information.
Once you successfully create a new account, you will create a bucket to store your data in, then collect and save some information from your Backblaze dashboard to use later.
Step 2: Create a Backblaze B2 Bucket and Set Up an Application Key
A “bucket” is a container that holds your files uploaded by your Veeam software to Backblaze B2 Cloud Storage. When configuring your bucket, you will give it a unique name, choose whether it’s private or public (most customers choose private buckets), and turn on Object Lock to secure your files and make them immutable. (This is an important security step you won’t want to miss.)
Each bucket is associated with a name and an S3 Endpoint. You should jot down this Endpoint to use later in Veeam to connect with Backblaze.
Before you exit the Backblaze console, you will set up an Application Key that allows Veeam to connect to and access your storage bucket securely. You give the Application Key a name and make some additional choices to finish setting it up. Finally, you will jot down some details for the Application Key, such as keyID, keyName, and applicationKey, which is essentially a passcode for the key. Be sure to write these down immediately after creating the key, or you won’t be able to access it in plaintext again.
Step 3: Add Backblaze B2 Cloud Storage as a Cloud Tier Repository in Veeam
Switching over to the Veeam console, you will log into your software and create a Cloud Tier repository to interface with Backblaze B2 Cloud Storage.
Before you do that, however, you need to have a local repository created. The tutorial assumes that you have one already and have been using Veeam to backup locally.
To set up your cloud tier, you will follow a few simple steps:
- Choose your object storage type.
- Give it a name.
- Enter your Backblaze S3 Endpoint value.
You will also be prompted to enter your credentials, which is the Application Key information you’ve already set up when you created your Backblaze B2 Bucket. Before exiting that area, Veeam will test the connection to ensure it can reach your Bucket. The final stage in this step allows you to turn on Object Lock to keep your backup files safe.
Step 4: Create the Scale-Out Backup Repository in Veeam
Still working within the Veeam console, you will also set up a scale-out repository to handle backup data load. During this step, you will name your Veeam Scale-Out repository, choose a few options, select the Cloud Tier repository you just created in step three, and ensure that your files are backed up immediately.
Step 5: Create a Backup Job in Veeam
The final stage of our backup tutorial walks you through the process of setting up a backup job. You will continue working in Veeam to create a new backup job using cloud storage. In the video we show you a Virtual Machine backup, but you can create several other types of backup jobs as needed. You can then name your backup job, add the files you want to backup, and choose where you want to save them (in this case, the Scale-Out repository we just created).
You also have options to optimize storage and schedule your backup job to run as often as you like. Then, you can test it immediately to see how it goes.
We hope this video guide and brief explanation were useful in helping you get the most out of both Veeam and Backblaze. If you have thoughts for topics on future videos, sound off in the comments. And be sure to subscribe to our YouTube channel for more great content!








 Keeping Passwords Secret and Your Data Safe